Befrey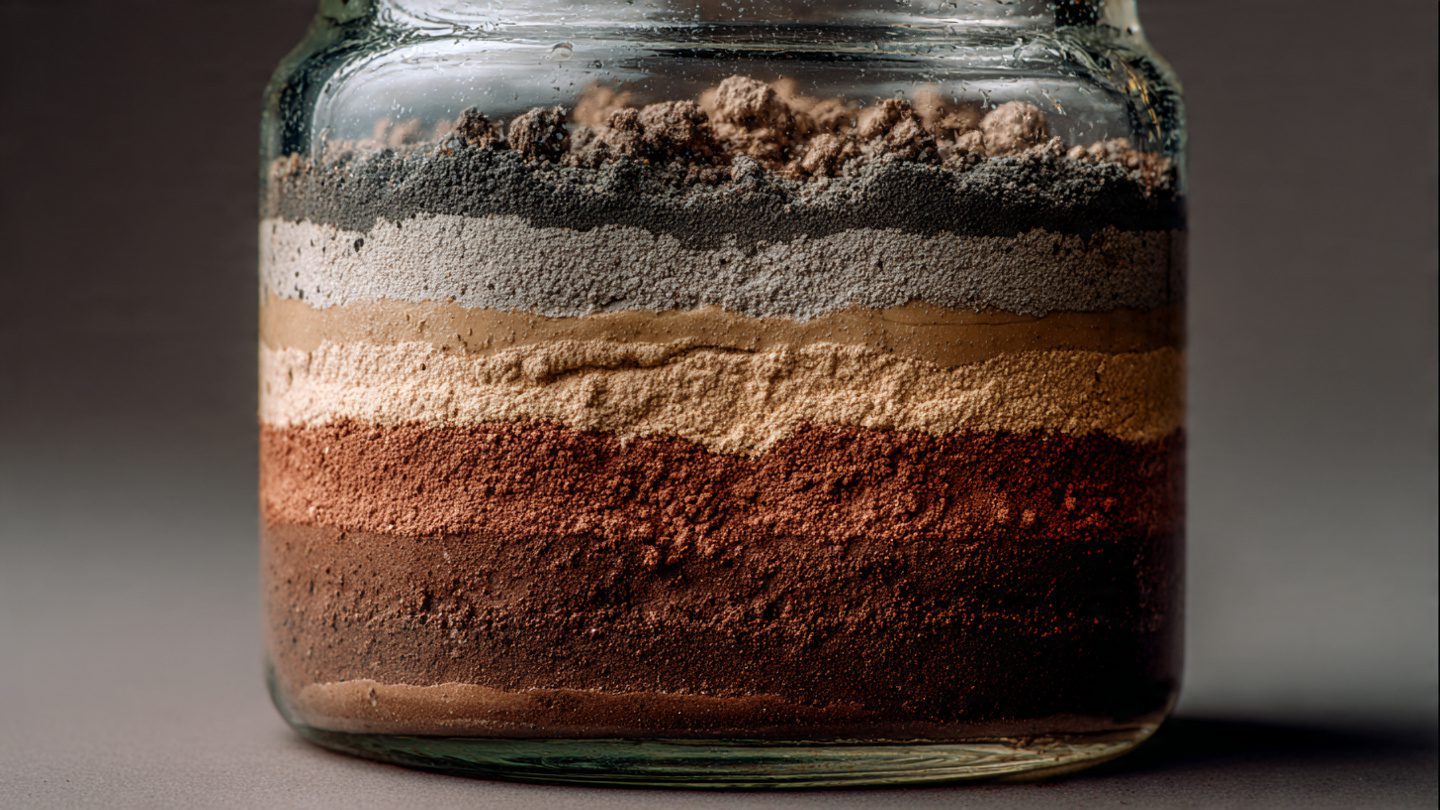
If you want to understand how to test soil at home, you’re already making one of the smartest decisions in gardening. Testing soil at home, checking soil quality yourself, and analyzing garden soil without a lab are powerful skills that can completely change your results. When you learn how to test soil at home, you gain control over your garden’s health, plant growth, and long-term productivity. Instead of guessing what your soil needs, you can make precise improvements based on real observations.
Why Soil Testing at Home Is More Important Than You Think
Most gardeners focus on plants. Few focus on soil. This is a mistake. Soil is the foundation of everything. If your soil is wrong, nothing else will work properly.
Testing soil at home gives you direct insight into what is happening underground. You are no longer relying on assumptions. You are working with facts. This alone can dramatically improve your success rate.
Healthy soil is a balance of structure, nutrients, moisture, and biological life. If even one of these factors is off, plants will struggle. Soil testing helps you identify exactly which part is failing.
Another important reason is cost efficiency. Many people waste money on fertilizers and products they do not need. By testing your soil, you apply only what is necessary.
Home soil testing is also fast and repeatable. You can check your soil anytime during the season. This allows you to adjust your strategy as conditions change.
Understanding your soil is like reading a hidden language. Once you learn it, gardening becomes much easier and far more predictable.
Signs your soil needs testing
Your soil will often show clear signs when something is wrong. The problem is that many gardeners ignore these signals.
One of the most common signs is poor plant growth. If your plants grow slowly, produce small leaves, or fail to flower, your soil likely has issues that need attention.
Yellowing leaves can indicate nutrient deficiencies. However, without testing, you cannot know which nutrient is missing. Guessing often leads to overcorrection.
Water problems are another major indicator. If your soil stays wet for too long or dries out too quickly, it suggests structural issues that need to be tested and confirmed.
Weeds can also reveal soil conditions. Certain weeds thrive in specific soil types. Their presence can give you clues about compaction, pH, or nutrient imbalance.
Another overlooked sign is soil color and smell. Healthy soil is dark and earthy. If it looks pale or smells sour, something is off.
Recognizing these signs early allows you to act before the problem becomes severe.
Easy soil testing methods for beginners
You do not need expensive equipment to start testing your soil. Some of the most effective methods are simple and accessible.
The squeeze test is one of the easiest. Take a handful of moist soil and press it in your hand. If it forms a hard ball, it contains a lot of clay. If it falls apart instantly, it is sandy.
The color test is another simple method. Dark soil usually indicates high organic matter. Light-colored soil often lacks nutrients and biological activity.
Smell testing is surprisingly accurate. Healthy soil smells fresh and earthy. Bad soil smells sour or lifeless, indicating poor microbial activity.
The root observation method is also useful. When you pull up plants, look at their roots. Healthy roots are white and spread out. Weak roots are thin, brown, or limited.
Water absorption is another quick indicator. Pour water on the soil and observe how it behaves. Fast absorption or slow pooling both signal potential problems.
These beginner methods provide a solid starting point and help you understand your soil without tools.
DIY soil texture test step by step
Understanding soil texture is essential. It determines how water, air, and nutrients move through the soil.
Start by collecting soil from different parts of your garden. Mix it to get a representative sample. Remove stones and debris.
Place the soil in a clear jar. Fill it with water and shake it vigorously. Then let it sit undisturbed for 24 hours.
After settling, you will see layers. Sand will be at the bottom. Silt will form the middle layer. Clay will settle on top.
Measure the thickness of each layer. This tells you the composition of your soil. Knowing this helps you decide how to improve it.
This test is simple but powerful. It gives you a visual understanding of your soil structure.
Once you know your soil type, you can make targeted improvements instead of guessing.
How to check soil pH without a kit
Soil pH affects everything. It controls how nutrients are absorbed by plants. Even if nutrients are present, the wrong pH can make them unavailable.
One natural method is the vinegar and baking soda test. Take two samples of soil. Add vinegar to one. If it fizzes, your soil is alkaline.
Add water and baking soda to the other sample. If it fizzes, your soil is acidic. If neither reacts, your soil is close to neutral.
Another method is using plants as indicators. Certain plants prefer specific pH levels. Observing what grows naturally can give you clues.
You can also use red cabbage juice as a natural pH indicator. It changes color depending on acidity or alkalinity.
While these methods are not as precise as lab tests, they provide useful insights.
Understanding pH allows you to adjust your soil for optimal plant growth.
How to test garden soil nutrients naturally
Testing nutrients at home is more challenging, but still possible through observation and simple techniques.
Plant performance is the first indicator. Nitrogen deficiency causes yellow leaves. Phosphorus deficiency leads to poor root growth. Potassium deficiency affects overall plant strength.
Compost response testing is another method. Add compost to a small area and observe plant improvement. If plants respond quickly, your soil likely lacks nutrients.
Leaf color and growth patterns provide clues. Healthy plants have vibrant color and steady growth. Weak plants show uneven development.
You can also compare different areas of your garden. If one section performs better, it likely has more nutrients.
Natural indicators take time to interpret, but they are effective when combined with other tests.
Understanding nutrient levels helps you avoid over-fertilizing and damaging your soil.
Home soil test for drainage and composition
Drainage is one of the most critical factors in soil health. Without proper drainage, roots suffocate and plants fail.
To test drainage, dig a hole about 30 cm deep. Fill it with water and let it drain completely. Then fill it again and measure how long it takes to drain.
If water drains within minutes, your soil is too sandy. If it takes several hours, your soil may be clay-heavy or compacted.
This test gives you a clear understanding of water movement in your soil.
You can also observe surface behavior during rain. Pooling water indicates poor drainage. Rapid drying indicates low water retention.
Combining drainage and composition tests gives you a complete picture of your soil.
Once you understand both, you can make targeted improvements that actually work.
Combining Test Results for a Complete Soil Profile
Each test gives you a piece of the puzzle. The real power comes from combining them.
Texture tells you how soil behaves physically. pH tells you how nutrients are accessed. Nutrient testing shows what is missing. Drainage reveals water movement.
When you combine all these factors, you create a full soil profile. This allows you to make precise decisions.
For example, clay soil with poor drainage needs organic matter. Sandy soil with low nutrients needs compost and moisture retention.
pH adjustments can unlock nutrients already present in the soil. This reduces the need for fertilizers.
A complete understanding of your soil eliminates guesswork. You move from trial-and-error to strategic gardening.
This is what separates beginners from advanced gardeners.
Common Mistakes When Testing Soil at Home
Even simple tests can go wrong if done incorrectly. Avoiding mistakes ensures accurate results.
One common mistake is testing only one area. Soil can vary across your garden. Always take multiple samples.
Another mistake is testing dry soil. Moist soil gives more accurate results, especially for texture tests.
Rushing the process is also a problem. Some tests require time to settle or react properly. Patience is important.
Ignoring seasonal changes can lead to confusion. Soil conditions change throughout the year. Regular testing provides better insights.
Over-relying on one test is another issue. Always combine multiple methods for a complete picture.
Accuracy comes from consistency and attention to detail.
Long-Term Benefits of Regular Soil Testing
Testing your soil once is helpful. Testing it regularly is transformative.
You begin to understand how your soil changes over time. This allows you to adjust your strategy season by season.
Regular testing prevents problems before they become serious. Early detection saves time and effort.
It also improves efficiency. You apply only what your soil needs, reducing waste and cost.
Over time, your soil becomes healthier and more stable. Plants grow stronger and require less intervention.
Soil testing is not just a task. It is a long-term investment in your garden’s success.
How to Improve Plant Growth Naturally Complete Organic Growth Guide
How to Save a Plant After Transplant Shock
How to Revive a Dried Out Plant Step-by-Step
Summary
Learning how to test soil at home gives you complete control over your garden. By understanding texture, pH, nutrients, and drainage, you can make precise improvements that lead to healthier plants and better results. Simple methods can reveal powerful insights, and when combined, they create a full picture of your soil’s condition. With regular testing, gardening becomes easier, more predictable, and far more successful.
FAQ
1. How often should I test my soil at home?
At least once per year, ideally before planting season.
2. Are home soil tests accurate enough?
Yes, for general gardening purposes they provide very useful insights.
3. Can I test soil without any tools?
Yes, many methods use simple household items and observation.
4. What is the most important soil test?
Texture and drainage tests are the most fundamental.
5. Should I still use lab testing?
For precise results, lab testing is useful, but home testing is enough for most gardeners.
CTA (Call-to-Action)
Start testing your soil today. Use these simple methods and take control of your garden’s success. The better you understand your soil, the better your plants will grow.